
Welcome to Opaquer manual
Opaquer. Obfuscate like a beast. Protect like a boss. Powerful protection.

Code obfuscation is a software-protection technique designed to prevent unauthorized reverse engineering.
Its core objectives include detecting attempts to analyze or tamper with the application, resisting such attacks, and modifying program behavior so that, if protection is bypassed, the software degrades in subtle, non-obvious ways.
-
Opaquer .NET Obfuscator is a Windows-based graphical tool that incorporates all known software protection techniques and obfuscation algorithms. It offers an intuitive interface, enabling .NET developers to protect their products quickly and reliably. Opaquer is a universal .NET obfuscator that can also be used as a console executable.
- If you need to obfuscate your .NET products on a regular basis, Opaquer .NET Obfuscator is the right solution for you. Rustemsoft LLC uses Opaquer internally to secure all of its .NET executables and assemblies. The command-line (CLI) version, which runs in batch mode, is especially useful for scheduled product updates and can be seamlessly integrated into CI/CD Azure pipeline post-build events. Simply assign the settings for an assembly in the GUI version first, and then the batch obfuscation task will apply those settings.
-
Key Features of Opaquer .NET Obfuscator for Common .NET Protection Tasks
-
Blocks reverse engineering attempts
Opaquer transforms IL code into a form that is extremely difficult for humans or automated tools to interpret, effectively preventing source-level reconstruction. -
Produces assemblies that cannot be cleanly recompiled
After obfuscation, the resulting IL is intentionally inconsistent and misleading, making recompilation by decompilers nearly impossible. -
Supports all .NET application types
Works with any .NET executable, library, or assembly, including console apps, Windows desktop apps, services, and class libraries. -
Encrypts all string literals
Sensitive strings - API keys, SQL queries, configuration values - are encrypted and decrypted only at runtime, preventing static extraction. -
Compatible with every .NET version, including .NET 10
Full support for .NET Framework 1.0–4.8, .NET Core, .NET 5–10, and all modern runtime variations. -
Advanced control flow obfuscation
Opaquer’s control flow transformations disrupt decompilers and deobfuscators by injecting opaque predicates, fake branches, and non-linear execution paths. -
Identifier scrambling
Class names, methods, fields, properties, events, and other metadata are renamed to meaningless tokens, removing semantic clues from the codebase. -
Comprehensive protection pipeline
Opaquer combines renaming, control flow, string encryption, anti-tampering, and anti-debugging into a unified protection strategy suitable for production builds.
-
-
Why You Need Opaquer .NET Obfuscator
You benefit from Opaquer when:
-
You understand the value of obfuscation and its role in software security.
You recognize that obfuscation is a practical, non-intrusive way to protect intellectual property and sensitive logic. -
You know that obfuscation prevents direct source code extraction.
Without protection, .NET assemblies can be decompiled into readable C# or VB.NET within seconds. Opaquer closes that gap. -
You have experience applying obfuscation appropriately.
You understand when to obfuscate, what to protect, and how to integrate obfuscation into your build and deployment workflow. -
Your organization evaluates the risk of code exposure consistently.
You operate in an environment where protecting proprietary algorithms, licensing logic, or business rules is a recognized security requirement. -
You need a reliable, automated protection step in your CI/CD pipeline.
Opaquer’s command-line interface and build-friendly design make it easy to integrate into modern DevOps processes. -
You want long-term maintainability and compatibility.
Opaquer’s support for legacy and cutting-edge .NET versions ensures your protection strategy remains stable as your application evolves.
-
Authoring requirements
Opaquer is designed for 64-bit operating systems and works under the Microsoft® .NET
-
The Opaquer .NET Obfuscator runs on:
- Microsoft Windows 10 family
- Microsoft Windows 11 family
To work effectively with Opaquer, your system should meet or exceed the following modern PC-software requirements:
-
Operating System:
Windows 10 (latest updates recommended)
Windows 11 (all editions supported)
-
Processor:
1.6 GHz or faster, dual-core or better
(Modern Intel/AMD processors easily exceed this)
-
Memory (RAM)
Minimum: 4 GB
Recommended: 8 GB or more for smooth multitasking and large project builds
-
Storage:
At least 20 GB of available disk space
(SSD strongly recommended for faster build and obfuscation operations)
-
Graphics:
No dedicated GPU required
(Opaquer does not rely on hardware acceleration)
-
Display:
Minimum resolution: 1280×720
Recommended: 1920×1080 or higher for comfortable UI usage
-
Additional Recommendations
Latest .NET SDKs installed for your target frameworks
Visual Studio 2026 or newer for best integration
Stable internet connection for features that rely on cloud-based virtualization and license validation
License Agreement
Before installing Rustemsoft LLC Opaquer .NET Obfuscator please read carefully terms and conditions of this agreement.
You will express your consent to be bound by the terms of this Agreement by obtaining or opening Software media package. If you do not agree to all terms of this agreement do not use Software and destroy all copies of Software from your computer.
This Software License Agreement (“Agreement”) is a legal contract between the individual or entity (“Customer”) and the software developer (“Developer”) governing the use of the accompanying software product, including any associated media, documentation, updates, or enhancements (“Software”). By installing, accessing, or using Software, Customer agrees to be bound by the terms of this Agreement.
1. Grant of License
Software is licensed, not sold. Subject to the terms of this Agreement, Developer grants Customer a limited, non-exclusive, non-transferable license to install and use one copy of Software on a single computer. Customer may remove Software from one computer and install it on another, provided that Software is never installed or used on more than one computer at the same time without Developer’s prior written consent.
2. Ownership and Intellectual Property
Software is protected by copyright laws, international treaties, and other intellectual property protections.
All rights, title, and interest in and to Software remain exclusively with Developer.
Customer acquires no ownership rights in Software.
Customer shall not:
- modify, translate, adapt, or create derivative works of Software
- attempt to decipher, disassemble, decompile, or reverse engineer Software
- circumvent or interfere with any security, licensing, or activation mechanisms
- reproduce, distribute, or publicly display Software without Developer’s written permission
3. Restrictions on Use
Customer may not:
- rent, lease, sublicense, lend, or commercially exploit Software
- use Software to develop competing products or services
- make copies of Software except for a single archival backup
- distribute Software or make it available to third parties
- use Software in any manner that violates applicable laws or third-party rights
Any unauthorized use constitutes a material breach of this Agreement.
4. License Activation and Validation
Software may require online activation or periodic license validation. Customer agrees that Software may automatically connect to Developer’s servers for the purpose of verifying license authenticity.
Attempts to bypass activation or validation mechanisms are strictly prohibited.
5. Third-Party Assemblies and Content
Assemblies, executables, or other content accessed, processed, or modified through Software remain the property of their respective owners and may be protected by copyright or other laws.
This Agreement grants Customer no rights to such third-party content.
Developer disclaims all liability for Customer’s use or misuse of third-party assemblies or executables.
6. Third-Party Components
Software may include or rely on third-party libraries or components. Such components are licensed under their respective terms, and Customer agrees to comply with all applicable third-party licenses.
7. Data Collection and Privacy
Software may collect limited technical information necessary for activation, diagnostics, or performance monitoring.
No personally identifiable information is collected except as required for licensing or support.
Customer consents to such data collection solely for the purposes of improving Software functionality and enforcing licensing terms.
8. No Warranties
Software is provided “as is” without any express or implied warranties, including but not limited to warranties of merchantability, fitness for a particular purpose, non-infringement, or suitability for any specific task.
Developer makes no representation that Software will meet Customer’s requirements or operate without interruption or error.
Developer is under no obligation to issue updates, patches, or enhancements.
9. High-Risk Use Disclaimer
Software is not fault-tolerant and is not designed or intended for use in hazardous environments requiring fail-safe performance, including but not limited to nuclear facilities, aircraft navigation, air traffic control, life-support systems, or weapons systems.
Developer expressly disclaims any warranty of fitness for such high-risk activities.
10. Limitation of Liability
To the maximum extent permitted by law, Developer and its suppliers shall not be liable for any direct, indirect, incidental, consequential, special, or punitive damages, including but not limited to loss of profits, revenue, data, business interruption, or inability to use Software, even if Developer has been advised of the possibility of such damages.
11. Indemnification
Customer agrees to indemnify, defend, and hold Developer harmless from any claims, damages, liabilities, or expenses arising from Customer’s misuse of Software or violation of this Agreement.
12. Export Compliance
Customer agrees not to export or re-export Software in violation of applicable export laws or regulations. Customer represents that they are not located in a country subject to embargo or sanctions.
13. Support and Discontinuation
Unless covered by a separate support agreement, Developer is not obligated to provide technical support.
Developer reserves the right to discontinue distribution, support, or development of Software at any time without notice.
14. Changes to Functionality (Free / Basic Version)
Developer may, at its sole and absolute discretion, modify, restrict, suspend, or discontinue any aspect of the Software’s features or functionality, including those provided in the free or Basic version, at any time and without prior notice. Such modifications may include, without limitation, the introduction of new features, the alteration or removal of existing features, or the full deactivation of specific functionality. Customer expressly acknowledges and agrees that continued access to or use of the Software following any such modification constitutes the Customer’s binding acceptance of the updated functionality. To the maximum extent permitted by applicable law, Developer shall have no liability whatsoever for any loss, impact, or consequence arising from or related to such changes.
15. Termination
Developer may terminate this Agreement at any time by providing notice to Customer. Customer may terminate this Agreement by destroying or permanently erasing all copies of Software.
Upon termination, Customer must immediately cease all use of Software and destroy all copies.
Sections relating to intellectual property, restrictions, warranties, liability, and indemnification shall survive termination indefinitely.
16. Governing Law and Jurisdiction
This Agreement shall be governed by and interpreted in accordance with the laws of the jurisdiction in which Developer is located.
Any disputes shall be resolved exclusively in the courts of that jurisdiction.
17. Severability
If any provision of this Agreement is found invalid or unenforceable, the remaining provisions shall remain in full force and effect.
18. Entire Agreement
This Agreement constitutes the complete and exclusive statement of the agreement between Developer and Customer and supersedes all prior proposals, understandings, or agreements, whether written or oral.
Getting started
Run Opaquer. The tool has 3 main menu items: "Open Assembly", "Save Settings", and "Obfuscate".
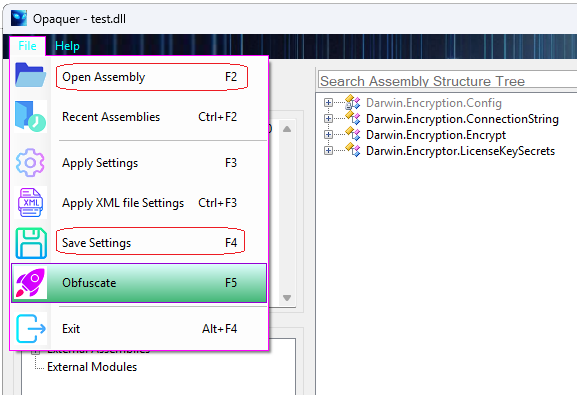
Open your .NET assembly by using "Open" dialog box. On the Details Tab page you able to browse main assembly properties and the assembly structure as well.
Adjust your assembly obfuscation preferences by using all of presented tab pages.
Click the "Save Settings" button to store the obfuscation settings as the preferred settings to be used when opening this assembly next time when you will use Opaquer again.
Also the stored Settings may be used for command-line obfuscation in batch MS-DOS mode. Learn more about Opaquer console usage.
If you have saved pre-stored Settings just click F3 button and select from pop-up list an assembly you would like to open for obfuscation. It will populate the assembly into Opaquer interface with all previously stored specific preferences.
Push "Obfuscate" (or F5 button).
The duration of the operation depends on two primary factors:
- The size and complexity of your assembly: larger assemblies naturally require more processing time.
- The intensity of your selected obfuscation settings: advanced features such as deep control-flow transformations, string encryption, and High-Intensity renaming increase processing workload.
Main Opaquer window
The Opaquer main window is split into several tab pages. The first page is Details Tab page. By using the page you able to browse main assembly properties and the assembly structure as well.
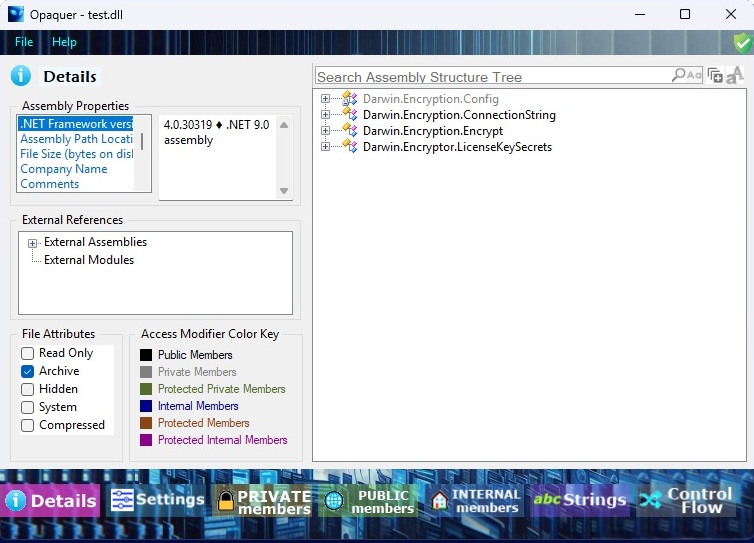
Click once on the plus or minus icon next to any member node in the Assembly Structure tree to expand or collapse its contents. When no such icon is displayed, the node has no further nested elements and represents the final level of that branch. A brief description of the currently selected member is always shown in the Status Bar, giving you quick contextual information without opening additional panels.
Command-line Interface
A command-line interface is essential because CI/CD pipelines rely entirely on automated, scriptable operations. After the project is compiled, the pipeline must be able to invoke the obfuscator without human intervention. This ensures that every release build is protected consistently, predictably, and with the exact same configuration.
In practice, the CLI becomes a premium feature because it enables two major automation scenarios:
1. Full CI/CD Pipeline Integration (Post-Compilation Automation)
The CLI allows the obfuscator to be executed as part of a build script, a DevOps job, or a release pipeline step. This is critical because:
- The pipeline compiles the project then immediately calls the obfuscator.
- No developer needs to open a GUI or click anything.
- Every build (nightly, staging, production) gets the same protection profile.
- Security becomes part of the pipeline, not an afterthought.
This is how teams enforce secure-by-default release processes.
2. Local Developer Automation and Tooling Integration
Even outside CI/CD, the console interface is valuable for developers who want:
- Custom build scripts
- MSBuild or dotnet-build integration
- Automated obfuscation during packaging
- Repeatable command sequences for different configurations
- Batch processing of multiple assemblies
In these cases, the CLI acts as a scriptable engine behind the GUI, enabling developers to embed obfuscation into their own workflows.
Obfuscator console usage
1. with pre-stored obfuscation settings (a preferable way):Opaquer [SettingsName]'SettingsName' is a name of pre-stored Settings.
The command-line version running in batch mode is much useful for your scheduled products updates. You have to assign settings for an assembly in Graphical User Interface (GUI) version first. Then the batch obfuscate task will use the settings.
Also you can use assembly obfuscation settings stored in a separate xml file per assembly.
The Opaquer has two ways to store configuration information for assemblies.
You can call obfuscation settings by the settings name as shown above. Also the obfuscation preferences could be stored per project in the .NET project folder in a separate xml configuration file.
-XMLFILE=[Path+FileName] Pre-stored Settings XML File Name with full pathExample:
Opaquer -x=C:/MyDir/MyAssemblySettings.xmlIn GUI you can call the xml pre-stored settings to apply in Opaquer interface by Ctrl+F3 ('Apply XML file Settings') key combination. The settings XML configuration file could be connected with your .NET project, is easily to backup, can be checked out with the project, can be shared between several users or taken to another development machine as a part of obtaining the .NET project source code from the source code repository.
Learn how to assign and save Assembly Settings by using GUI version.
2. The command-line interface
When you run Opaquer.exe in console MS-DOS mode it accepts the following command-line parameters:
USAGE:
Opaquer [SettingsName] [options]
OPTIONS:
[SettingsName] Name of a pre-stored Settings profile
-XMLFILE=[Path+FileName] Full path to a pre-stored Settings XML file
-SOURCE=[Path+FileName] Full path to the source assembly to obfuscate
-OUTPUT=[Path] Directory path for the obfuscated output assembly
-KEY=[Path+FileName] Full path to the strong-name key file
-METHOD=[Number] Naming method for symbol obfuscation:
0 - Non-Standard characters (default)
1 - Non-Displayable characters
2 - Alphabetic and Numeric Characters
3 - Synthetic Names (64 Characters)
-ALLPRIVATE Obfuscate all private members
-PUBLIC Obfuscate all public members
-CONCEALSTRINGS Conceal all System.String values
-FLOW Apply Control Flow Obfuscation to all methods
-HIDE Run without showing the console window
-WRITELOG Generate an error log if obfuscation fails
-? Display this help message
NOTES:
All option keys begin with '-'.
Options are recognized by their first character.
Verify your account in the GUI. Without verification, access will be denied.
EXAMPLES:
Opaquer MyAssemblySettings
Uses a Settings profile previously created in the GUI.
Opaquer -s=C:/MyDir/MyAssembly.dll -o=C:/Dir_New/ -k=C:/MyKey.key -a -p
Obfuscates the specified assembly using command-line options.
The MyAssembly.dll that located in C:/MyDir/ will be stored into C:/Dir_New/ directory after obfuscation.
Since the assembly is strong-named it will be signed with C:/MyKey.key.
The process will implement all private and all public members obfuscation.
Please note, when use Opaquer command-line interface the console command has to conform with MS-DOS commands rules. When you specify a parameter it should NOT have spaces.
If it does include spaces the passing argument must be surrounded with double quotes:
"C:\Program Files (x86)\FolderName\Opaquer.exe"
- Automated post-compilation protection in CI/CD pipelines
- Scriptable, repeatable workflows for developers
- Consistent security across all release builds
- Integration with modern DevOps tooling
Note You can run Opaquer as a single process at your PC. Please do not run the command-line interface while the Opaquer GUI is open. It will not start.
Settings Tab
Global settings can be specified on Settings page to control the obfuscation process.
The Settings interface allows you to configure how your assemblies are obfuscated and protected. It provides fine-grained control over renaming, signing, and additional protection mechanisms.
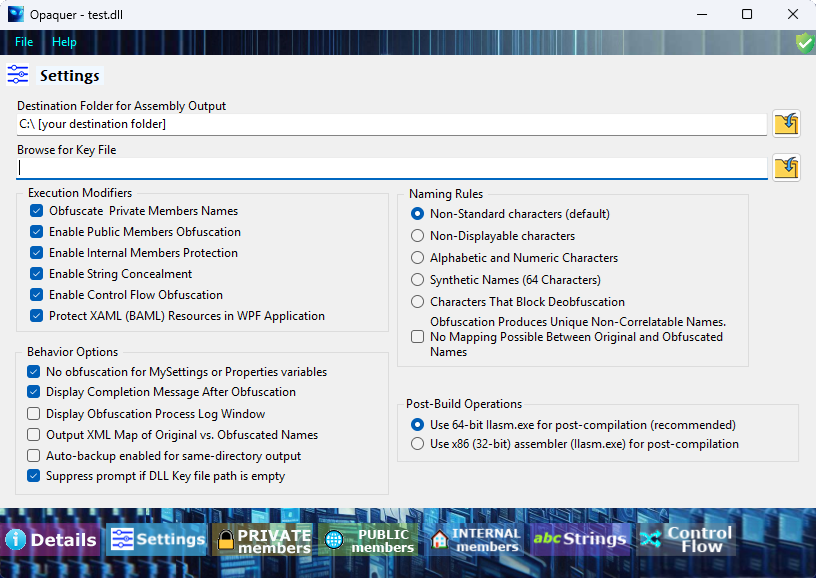
Naming Rules
Use the “Naming Rules” options to define how assembly members will be renamed during obfuscation. Renaming (also known as symbol obfuscation) affects:
- Classes
- Methods
- Fields and variables
- Other metadata members
Obfuscating both private and public members replaces meaningful names with randomized ones, making reverse engineering significantly more difficult.
Enabling “Non-Displayable Characters” takes this a step further by generating names that include invalid or non-printable characters. These names cannot be easily represented in source code, which helps prevent successful recompilation of the assembly after deobfuscation attempts.
Assembly Signing
You can sign input assemblies using a specified key file:
- If your assembly is already strong-name signed, the obfuscated output will be automatically re-signed using the original key.
- Ensure the key file path is correctly specified in the “Browse for Key File” field. Opaquer will handle the re-signing process automatically.
If the original key file is not available, you have alternative options:
- Delay sign the assembly (useful for development or testing scenarios)
- Remove the signature, allowing you to continue working with the protected assembly without strong-name verification
Selective Obfuscation
The Settings interface allows selective application of obfuscation:
-
Apply obfuscation to all private members, or limit it to specific groups:
- Classes
- Methods
- Fields
-
The same level of control is available for:
- Public members
- Internal members
In addition, you can enable or disable advanced protections such as:
- String encryption - protects hardcoded strings from being easily read
- Control flow obfuscation - transforms method logic into more complex structures to hinder analysis
Excluding Application Settings (MySettings / Properties)
For applications built with .NET Framework 2.0 or later, special namespaces are used to store application settings:
MySettings(VB.NET)Properties(C#)
These namespaces contain application-wide configuration values defined via the project’s Settings tab.
Important: Property names in these namespaces must not be obfuscated.
This is because:
- The property names are stored as string literals in MSIL
- The .NET runtime resolves them dynamically at execution time
If these names are changed during obfuscation, the runtime will fail to locate them, leading to application errors.
To avoid this issue, enable the option:
“No obfuscation for MySettings or Properties variables”
When selected, Opaquer will automatically exclude these members from renaming.
XML Renaming Map
During obfuscation, Opaquer generates an XML mapping file that records all renaming operations.
This file contains:
- Original member names
- Corresponding obfuscated names
The mapping file is especially useful for:
- Debugging obfuscated applications
- Interpreting exception stack traces
- Providing technical support
By referencing the XML map, you can translate obfuscated method and class names back to their original form when analyzing runtime errors.
Private, Public, and Internal Member Name Obfuscation
Name obfuscation scrambles the identifiers of classes, methods, variables, and other assembly members, making reverse engineering significantly more difficult. Meaningful names are replaced with unintelligible strings that provide no semantic clues to anyone attempting to analyze the code.
Certain Opaquer settings take this further by generating names that are incompatible with standard compilers, preventing decompiled code from being successfully recompiled.
Opaquer provides three dedicated interface pages, one each for Private, Public, and Internal access modifiers, that share a consistent layout and allow developers to select which members within each access scope should be targeted for renaming.
For EXE applications, the assemblies are generally self-contained. In that case, you can apply obfuscation much more High-Intensityly and rename all possible members, including public ones, without risking compatibility issues.
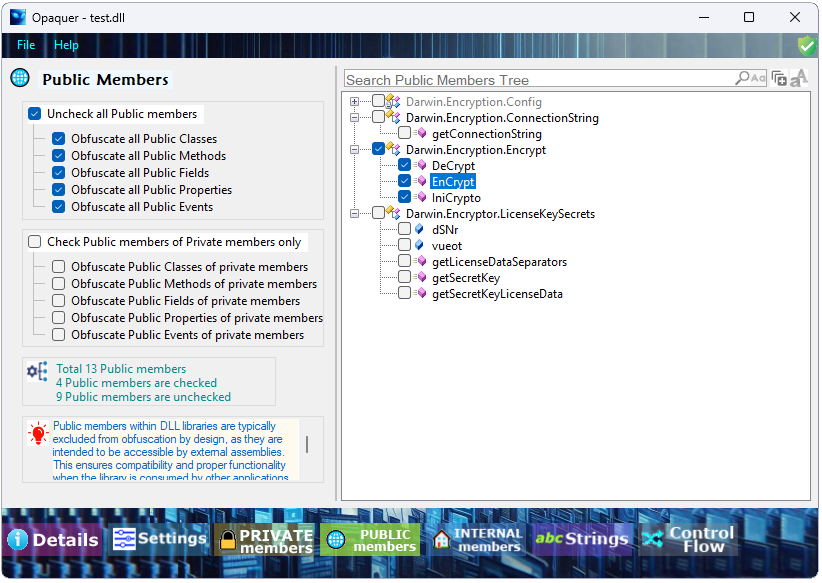
The three configuration pages for Private, Public, and Internal member name obfuscation share a largely identical interface layout. To avoid repetition, let’s focus on the Public Members page as the representative example.
Layout and Purpose of the Public Members Page
The Public Members tab is divided into two main panes. Its purpose is to let you browse all public members in your assembly and selectively include or exclude them from the obfuscation process.
-
Left Pane - Group Settings and Options
The left pane provides additional configuration options. Here you can check or uncheck entire groups of public members to include or exclude them from the obfuscation process. These group-level toggles allow you to quickly apply settings without manually selecting each individual member. -
Right Pane - Assembly Structure Tree
This pane displays a hierarchical, tree-style representation of your assembly. Each node represents an object-namespaces, classes, methods, fields, properties, and other members. The tree behaves like a nested object model: expanding a node reveals the objects it contains.- Click the plus or minus icon next to a node to expand or collapse it.
- If a node has no icon, it means it contains no further child objects.
- Selecting a checkbox next to a specific public member marks it for obfuscation.
Interaction and Customization
Opaquer allows you to adjust the interface to your workflow:
-
Resizable Panes
A central vertical splitter separates the two panes. When you hover the mouse pointer over it, the cursor changes to indicate that the panes can be resized. Drag the splitter left or right to allocate more space to either pane. -
Flexible Navigation
The tree view makes it easy to navigate through your assembly’s structure. You can expand only the areas you need, collapse sections you’re not working with, and visually inspect which public members are currently selected for obfuscation.
Obfuscation Selection
To include a public member in the obfuscation process, simply check its box in the right pane. To apply broader rules, use the checkboxes in the left pane to toggle entire categories of public members at once.
Excluding Members from Public Names Obfuscation
The user interface provides a dedicated Check Members to Exclude list box that allows you to specify members that must remain unchanged during the obfuscation process.
Any member that remains checked in this list will be excluded from obfuscation. This feature is particularly useful for protecting public types and members that serve as integration points with third-party libraries or external applications.
Obfuscating a public member that is referenced by an external assembly can break those references and potentially cause runtime errors. To preserve compatibility, such members should be explicitly excluded from obfuscation.
Example: IBKRMarketDataParser
Consider a type named IBKRMarketDataParser. This custom parser is responsible for receiving market data messages from Interactive Brokers (IBKR), interpreting their contents, and converting them into application-specific data structures.
Because IBKRMarketDataParser serves as an integration point between the application and external IBKR-related components, its public types and members may be referenced by vendor libraries or other assemblies. If these members are renamed or otherwise modified during obfuscation, external code may no longer be able to locate them. This can result in broken integrations or runtime exceptions.
To prevent this, the relevant public members of IBKRMarketDataParser should be selected in the Check Members to Exclude list. The obfuscator will then leave those members unobfuscated while continuing to protect the rest of the assembly.
Important: Public visibility alone does not necessarily mean that a member must be excluded from obfuscation. Exclusion is primarily required when a member is accessed by code outside the obfuscated assembly and its original name or signature is part of the integration contract.
Search Functionality: Quickly Find and Protect Sensitive Code
When working with a large .NET assembly, it is often unnecessary, or even undesirable, to apply the same obfuscation settings to every part of the codebase. Some areas of an application may contain particularly sensitive intellectual property or security-critical logic that deserves special attention.
To make it easier to locate such code, Opaquer provides keyword-based search functionality throughout its obfuscation configuration interface.
Search by Keywords
Each specific obfuscation window in Opaquer includes a dedicated Search field. You can enter a keyword, class name, method name, property name, or another relevant identifier to quickly locate matching members within the assembly.
For example, the screenshot above shows a search for the keyword Secret. Opaquer immediately identifies matching types, methods, and string values, allowing you to navigate directly to the relevant parts of the assembly.
This is especially useful when working with large assemblies containing hundreds or thousands of members.

Why Search Is Important for Obfuscation
Not every part of an application has the same level of security importance. In many applications, sensitive functionality is concentrated in relatively small areas of the codebase, such as:
- Encryption and cryptography
- License validation and licensing logic
- License keys and secrets
- Version and product information
- Authentication and authorization
- Security-related algorithms
- Proprietary business logic
- Communication with external services
- Configuration and connection logic
Instead of manually browsing through the entire assembly, you can search for relevant keywords and immediately focus on the members associated with that functionality.
For example, searching for terms such as Encrypt, Decrypt, License, Secret, Key, or Version can quickly reveal the areas that may deserve additional protection.
Selective Protection of Sensitive Members
Search is particularly valuable when you want to apply targeted obfuscation.
After locating a relevant member, you can select it in the Opaquer interface and configure the appropriate protection. This allows you to concentrate stronger or specialized obfuscation techniques on the most sensitive portions of your application while maintaining appropriate compatibility for the rest of the assembly.
For example, an application might contain a LicenseKeySecrets class containing licensing parameters and secret values. Searching for Secret can locate this class and its related members immediately. You can then review the results and select the appropriate members for protection.
This approach makes the obfuscation process more deliberate: find the sensitive code first, then decide how it should be protected.
Search Makes Large Projects Easier to Manage
For a small assembly, manually navigating through namespaces and members may be sufficient. For a large commercial application, however, finding a particular class or method can become time-consuming.
Keyword search provides a much faster workflow:
- Identify the functionality you want to protect.
- Enter a relevant keyword in the Search field.
- Review the matching types and members.
- Select the members that require protection.
- Configure the appropriate obfuscation options.
- Run the obfuscation process.
This is particularly useful when you already know what you want to protect but do not want to spend time manually locating it within a complex assembly.
Search as Part of a Targeted Obfuscation Strategy
Effective obfuscation is not necessarily about applying every available protection to every member. In real-world .NET applications, some members may need to remain compatible with external assemblies, while other sections may contain especially valuable intellectual property.
Opaquer's search functionality helps you navigate this distinction by making it easy to locate specific areas of the codebase and configure their protection individually.
Search turns a potentially overwhelming assembly into a focused set of security-relevant areas, helping you spend your obfuscation effort where it matters most.
Benefits of Name Obfuscation in .NET Assemblies
This tutorial explains why name obfuscation is an essential first step in protecting .NET applications from reverse-engineering. You will learn how .NET metadata exposes readable identifiers, how easily compiled assemblies can be decompiled, and how Opaquer .NET Obfuscator applies name obfuscation to reduce this risk.
1. Overview
.NET assemblies contain rich metadata that preserves class names, method names, field names, and other identifiers. While this metadata is useful for debugging and reflection, it also makes compiled applications easy to inspect and reverse-engineer.
Name obfuscation replaces human-readable identifiers with meaningless symbols, making the internal structure of your application significantly harder to understand.
This tutorial demonstrates:
- How identifiers appear in IL before obfuscation
- How Opaquer .NET Obfuscator transforms these identifiers
- How advanced naming modes prevent recompilation of modified IL
2. Preparing a Sample Application
To illustrate the process, create a simple console application. The following examples show equivalent C# and VB.NET versions. Both versions print a greeting along with the current date and time. Two private fields are included so we can observe how they appear before and after obfuscation.
C# Example
using System;

struct Module1
{
        private string str = "Hello World! Today is:";
        private System.DateTime today = Now;

        void Main()
    {
        Console.WriteLine(str + System.Convert.ToString(today));
    }
}
VB.NET Example
Imports System

Module Module1
        Private str As String = "Hello World! Today is:"
        Private today As Date = Now

        Sub Main()
        Console.WriteLine(str + CStr(today))
        End Sub
End Module
After compiling, you will obtain an executable such as ConsoleApplication1.exe.
3. Inspecting the Assembly with ILDasm
The .NET SDK includes ILDasm, a disassembler that displays IL (Intermediate Language) and metadata stored in an assembly. Running ILDasm on the compiled executable reveals all identifiers exactly as they appear in the source code.
Example IL Output (Before Obfuscation)
(Excerpted for clarity)
.class private auto ansi sealed beforefieldinit Module1
{
        .field private static string str
        .field private static valuetype [mscorlib]System.DateTime today

        .method public static void Main() cil managed
    {
        .entrypoint
        IL_0001: ldsfld string ConsoleApplication1.Module1::str
        IL_0006: ldsfld valuetype [mscorlib]System.DateTime ConsoleApplication1.Module1::today
        IL_0015: call void [mscorlib]System.Console::WriteLine(string)
        IL_001c: ret
    }
}
Even without IL expertise, you can clearly see:
- Class name (
Module1) - Method name (
Main) - Field names (
str,today) - Program logic
This transparency is why .NET assemblies are vulnerable to reverse-engineering. Modern decompilers can reconstruct high-level C# or VB.NET code that closely resembles the original source.
4. Applying Name Obfuscation
Next, open the compiled executable in Opaquer .NET Obfuscator.
Configuration Steps
- Open Options.
- Under Naming Rules, select Alphabetic and Numeric characters.
- Enable obfuscation for All Private and All Public members.
- Build the obfuscated assembly.
The application will continue to run normally, but its internal structure becomes harder to interpret.
Example IL Output (After Standard Name Obfuscation)
.class private auto ansi sealed beforefieldinit '0AAAA'
{
        .field private static string '1AAA0'
        .field private static valuetype [mscorlib]System.DateTime '2AAAA'

        .method public static void '1AAAA'() cil managed
    {
        .entrypoint
        IL_0001: ldsfld string ConsoleApplication1.'0AAAA'::'1AAA0'
        IL_0006: ldsfld valuetype [mscorlib]System.DateTime ConsoleApplication1.'0AAAA'::'2AAAA'
        IL_001c: ret
    }
}
All identifiers have been replaced with randomized alphanumeric tokens. This makes the code less readable, but the IL is still valid and can be recompiled using ILAsm.
5. Using Non-Recompilable Name Obfuscation
Opaquer .NET Obfuscator also supports a more High-Intensity naming mode that uses characters invalid in IL identifiers, such as ?.
Configuration Steps
- Open Options.
- Under Naming Rules, select Non-Displayable characters.
- Rebuild the obfuscated assembly.
Example IL Output (Non-Recompilable Mode)
.class private auto ansi sealed beforefieldinit '?'
{
        .field private static string '?'
        .field private static valuetype [mscorlib]System.DateTime '?'

        .method public static void '?'() cil managed
    {
        .entrypoint
        IL_0001: ldsfld string ConsoleApplication1.'?'::'?'
        IL_0006: ldsfld valuetype [mscorlib]System.DateTime ConsoleApplication1.'?'::'?'
        IL_001c: ret
    }
}
In this mode:
- All identifiers are replaced with the same invalid character
- The IL cannot be recompiled
- Manual reconstruction becomes significantly more difficult
This provides a stronger barrier against reverse-engineering.
6. Summary and Next Steps
Name obfuscation is the first essential step in protecting .NET assemblies. It:
- Removes meaningful identifiers
- Obscures program structure
- Reduces the effectiveness of decompilers
- Prevents recompilation when using invalid-character naming modes
For comprehensive protection, combine name obfuscation with additional Opaquer .NET Obfuscator features such as:
- Control-flow obfuscation
- String and resource encryption
- Anti-tampering
- Anti-debugging
- Method virtualization
These techniques work together to significantly increase the difficulty of analyzing or modifying your .NET applications.
Strings Encryption
Strings can provide valuable clues to anyone attempting to reverse-engineer your code. For this reason, it's wise to protect your string data from prying eyes. While no method can stop a determined hacker from eventually deciphering the conversion and accessing your data, you can significantly raise the bar. For example, an attacker trying to crack a licensing routine will typically start by searching for license-related strings to quickly locate the relevant code section.
Opaquer makes this process much harder by encrypting the strings embedded in your .NET assembly. It works by injecting a decryption routine directly into the assembly and calling that routine at runtime to restore the original string values. This way, static analysis tools see only encrypted data, not the plaintext strings.
Two Approaches to String Protection
1. Keep Strings Inside the Output Assembly
In this approach, encrypted strings remain within the main .NET assembly. The decryption logic is also embedded in the assembly, and strings are decrypted on the fly when needed. This method is simple to deploy (no extra files) but slightly less secure, because both the encrypted strings and the decryption mechanism reside in the same managed assembly, still a significant obstacle for casual reverse-engineering, but not impenetrable.
2. Store Strings in a Separate Native DLL (Recommended for High Security)
Strings are critical parts of your code’s logic. For stronger protection, you can move them into native code. Opaquer generates a separate C++ DLL that contains the protected strings in native machine code. Native code is much harder to reverse-engineer than managed code, it requires deep expertise in assembly language and low-level debugging. Additionally, the strings inside this DLL are themselves encrypt-protected, adding another layer of security.
- Select the "Strings Stored in Separate DLL" option in Opaquer.
- Opaquer will generate a C++ DLL that holds the protected strings.
- This native DLL is placed in the same directory as your output assembly.
- You must specify a name for the separate DLL file (default is
appExtension.dll). - When your .NET assembly runs, it calls into this native DLL to retrieve the original string values.
You must include the separate strings DLL in your product distribution package. Your final .NET assembly and this DLL must be installed together in the same folder. Without the DLL, your .NET assembly will not function.
Security Benefit:This mechanism ensures that decompilers cannot see or decipher the string objects in your output assembly. The actual string values become completely invisible to static analysis tools, protecting sensitive information like license keys, URLs, error messages, or embedded secrets.
Summary
| Method | Pros | Cons |
|---|---|---|
| Strings inside assembly | Simple, single-file deployment | Strings and decryption both in managed code |
| Strings in separate native DLL | Very high security, native code is hard to reverse-engineer | Requires deploying an extra DLL; more complex setup |
For maximum protection of sensitive string data, especially in licensing, authentication, or proprietary algorithms, the separate native DLL option is strongly recommended.
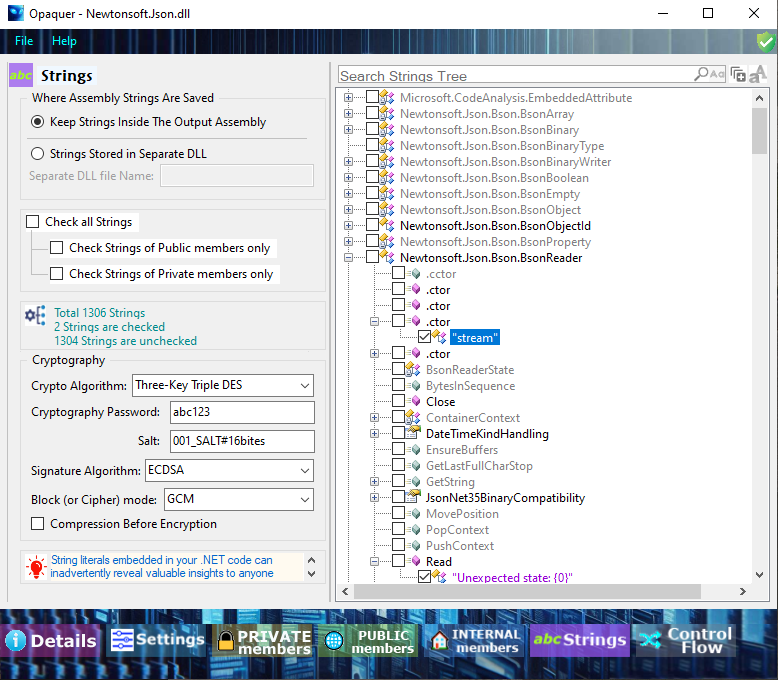
The Strings tab-page is split into two panes. By using the page you able to browse Strings values in the assembly structure and select/deselect them for obfuscation process.
The left section gives you ability to adjust some specific settings. The right section of the tab-page interface shows you a structure of your assembly. You can easily change the appearance of panes.
The right section displays a hierarchical view of your assembly structure in a tree-like structure. This Tree is regarded as an object with several objects inside it, representing assembly classes, methods, fields, and others. Check some particular String value and it will be encrypted.
Check/uncheck checkboxes in left pane. It will select/deselect corresponding String values groups to include them into obfuscation process.
You can set up cryptography algorithm for your String values encryption process. For this case you must enter a password for cryptography. The password will be encrypted and stored inside your obfuscated assembly.
Control Flow Algorithms
Control Flow obfuscation is designed to disrupt decompilers and deobfuscators by transforming .NET methods into highly irregular, non-linear execution paths. By scrambling both functions and procedures, it significantly increases the difficulty of reverse engineering, static analysis, and tampering attempts against protected assemblies.
How It Works
The Control Flow algorithm restructures the IL (Intermediate Language) instructions of each selected method. It introduces misleading branches, opaque predicates, and reordered instruction blocks while preserving the original runtime semantics. The result is a method body that behaves identically to the original but appears chaotic and unintelligible to humans and automated tools.
The transformation process includes:
- Fragmentation - Each method is decomposed into small, discrete code fragments.
- Semantics-Preserving Transformations - The algorithm applies a series of transformations based on the selected obfuscation criteria. These transformations alter structure, not behavior.
- Reassembly - The transformed fragments are reassembled into a new, hardened method body with scrambled control flow.
- Behavior Preservation - Despite the structural distortion, the obfuscated method produces the same runtime results as the original implementation.
This approach forces decompilers to produce unreadable or incorrect output, dramatically increasing the effort required to analyze protected code.
Performance & Size Considerations
Control Flow obfuscation introduces additional IL instructions, which can:
- Increase the size of the output assembly
- Add measurable runtime overhead
- Reduce JIT optimization opportunities
For most applications, this overhead is acceptable. However, if your project does not require maximum protection, you may choose to disable Control Flow obfuscation or apply it selectively to reduce executable size and improve performance.
Selective application is strongly recommended for large assemblies.
Algorithm Options
Opaquer provides two Control Flow algorithms, each suited to different protection needs:
Lightweight Control Flow Algorithm
- Applies a moderate level of transformation
- Suitable for most assemblies
- Balances protection, output size, and performance
- Recommended as the default option
High-Intensity Control Flow Algorithm
- Applies an High-Intensity set of transformations
- Produces maximum obfuscation strength
- Results in larger output assemblies and higher runtime overhead
- Best used for highly sensitive or security-critical code
Method Selection
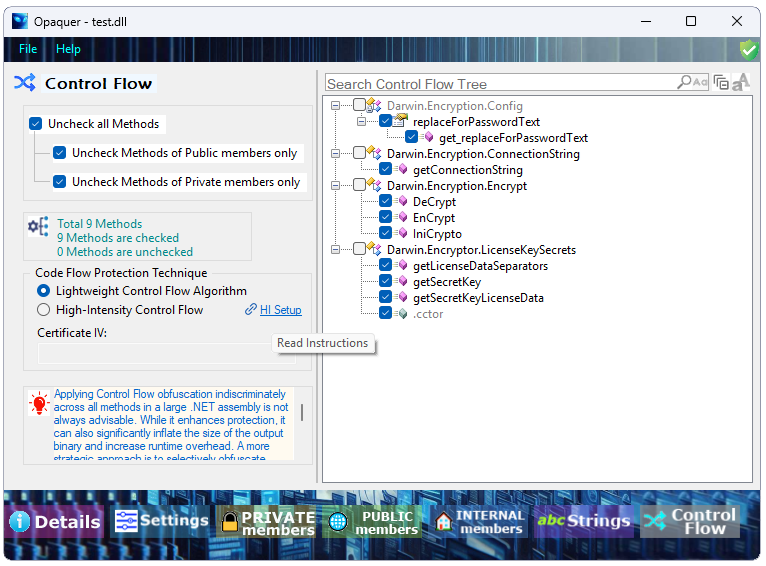
The Control Flow panel displays a hierarchical tree of all classes and methods in the loaded assembly. Each method can be individually included or excluded from obfuscation using checkboxes.
Convenience options at the top of the panel include:
- Uncheck all Methods - Clears all selections
- Uncheck Methods of Public members only - Excludes all public methods
- Uncheck Methods of Private members only - Excludes all private methods
A status bar beneath the panel displays:
- Total number of methods detected
- Number of methods selected for obfuscation
- Number of methods excluded
Control Flow Panel
The screenshot below illustrates the Control Flow configuration panel in Opaquer with a sample assembly loaded. The method tree on the right shows all available methods grouped by class.
Best Practices
- Apply Control Flow selectively - Focus on sensitive or security-critical methods rather than obfuscating the entire assembly.
- Use Lightweight mode by default - Escalate to High-Intensity only when the threat model requires maximum protection.
- Test thoroughly - Always verify that the obfuscated assembly behaves identically to the original.
- Monitor output size - If the assembly grows too large, reduce the number of protected methods or switch to the Lightweight algorithm.
Lightweight Algorithm: Guidance and Best Practices
Use Lightweight Selectively
Apply Lightweight only where needed. Avoid enabling all build methods, and always validate behavior thoroughly-its control-flow changes can introduce subtle, unpredictable effects.
Overview
The Lightweight algorithm performs deep control-flow restructuring to hinder reverse engineering. Because these transformations are already extensive, enabling every build method adds little security benefit while significantly increasing complexity and the likelihood of runtime issues.
Recommended Configuration
- Start with the smallest set of build methods that achieves the required protection.
- Roll out incrementally: enable Lightweight on a single module or build target, verify stability, then expand if needed.
What Changes and Why It Matters
- Lightweight rewrites method bodies, restructures control-flow graphs, and may alter exception handling, inlining, loop shapes, and branch ordering.
- These changes can break assumptions in reflection, dynamic invocation, native interop, serialization, debugging, profiling, or timing-sensitive logic.
Testing Checklist (Required Before Release)
- Unit tests: run the full suite, especially exception paths and edge cases.
- Integration tests: validate interactions across modules, libraries, and native components.
- Runtime validation: test under realistic load and across target OS versions.
- Reflection & serialization: exercise Type.GetMethod, dynamic invocation, Activator.CreateInstance, JSON/XML serializers, DataContract, and attribute-driven logic.
- Interop & P/Invoke: confirm all native calls and marshaling behavior.
- Startup & performance: compare startup time, memory usage, and hot-path latency against the unobfuscated build.
- Error monitoring: ensure logging, crash reporting, and symbol pipelines still produce meaningful diagnostics.
- Fuzzing / fault injection: where feasible, fuzz inputs and simulate resource failures to expose hidden assumptions.
Rollback & Mitigation
- Keep an unobfuscated or lightly obfuscated build for fast rollback.
- If issues arise, isolate the failing module by rebuilding it without Lightweight or disabling specific transformations.
- Use feature flags or build variants to contain problematic areas.
Documentation & Developer Notes
- Record which modules were processed with Lightweight and the exact tool version and settings used-critical for debugging and incident response.
- Notify QA and SRE teams when a Lightweight-obfuscated build enters staging so they can run targeted checks.
Caution
Lightweight increases the chance of subtle defects. Treat obfuscated builds as distinct release artifacts: apply changes gradually, validate thoroughly, and maintain a dedicated QA cycle.
High-Intensity Algorithm: Guidance and Best Practices
1. Overview
High-Intensity Control Flow is an advanced protection mode exclusive to the Enterprise version of Opaquer .NET Obfuscator. It pairs High-Intensity control-flow transformations with selective Code Virtualization - extracting small, critical fragments from chosen methods and running them at runtime inside a secure, cloud-backed virtual machine.
Key constraints:
- Requires an Enterprise Edition license
- Applies to a maximum of three methods per assembly
- Requires internet connectivity at runtime
- Depends on the
Skater.Cloud.Vaultpackage
2. What It Protects and How
Control-flow obfuscation restructures targeted methods into forms that decompilers struggle to interpret.
Selective Code Virtualization goes further: rather than virtualizing an entire method, Opaquer identifies and extracts high-value code fragments - such as license checks, cryptographic routines, or proprietary algorithm kernels - encrypts them, and stores them in the Skater Cloud Vault. At runtime, these fragments are downloaded, decrypted, and executed inside a built-in VM interpreter. The original binary retains none of this logic in plaintext.
Security benefits:
- Protected fragments are invisible to standard decompilers
- Attackers cannot reconstruct full method logic even with access to the compiled assembly
- The VM interpreter adds an additional layer that complicates both static and dynamic analysis
3. Requirements and Prerequisites
Before enabling High-Intensity Control Flow, confirm the following:
- Enterprise license - this feature is not available in lower tiers
- Method limit - select no more than three methods for High-Intensity virtualization; if you select more, Opaquer will automatically pick three using internal heuristics
- Internet access - target environments must have HTTPS connectivity to the Skater Cloud Vault at runtime
- Low call frequency - protected methods should run infrequently; ideal candidates are called once, such as during application startup
- NuGet dependency - add
Skater.Cloud.Vaultto your project - Certificate IV - enter your application's Certificate IV in the obfuscator UI (found under the High-Intensity Algorithm option); this value ties your virtualized fragments to your project and is used for decryption and verification at runtime
Note: Certificate IVs are unique and dynamic. They may be updated before each obfuscation run to reduce the risk of attacker exploitation.
4. How Code Virtualization Works
- Selection - Mark methods in the UI or via an obfuscation profile
- Analysis - Opaquer automatically identifies small, high-value segments within those methods; no manual fragment cutting is required
- Extraction and encryption - Selected fragments are removed from the assembly, encrypted, digitally signed, and bound to your Certificate IV
- Upload - Encrypted fragments are stored in your project area within the Skater Cloud Vault
-
Runtime loader - Opaquer injects a lightweight loader into the assembly that, at runtime:
- Authenticates with the Vault using your Certificate IV over a secure channel
- Downloads, decrypts, and verifies the fragments
- Executes them inside the built-in VM interpreter
- Caching and fallback - The loader can cache decrypted fragments locally (in encrypted form) to reduce repeated downloads. You can configure cache duration and define fallback behavior - such as degrading functionality or blocking protected features - when the Vault is unreachable
5. Step-by-Step Setup
- Open your project in Opaquer .NET Obfuscator
- Select High-Intensity Control Flow as the protection algorithm
- Mark up to three methods to protect; if you mark more, Opaquer will choose three automatically
-
Enter your Certificate IV in the High-Intensity Algorithm options panel
- To retrieve your Certificate IV, log in to your Keys Depot account (retrieval steps are included in the license installation guide you received at registration)
- Ensure your project references the
Skater.Cloud.VaultNuGet package - Run obfuscation - Opaquer will extract and encrypt the selected fragments, upload them to the Vault, and inject the virtualization runtime loader into your assembly
6. Best Practices
Choose methods carefully Target methods that run rarely - startup routines, license validation, and one-time initialization are ideal. Avoid protecting anything in a tight loop or frequently called hot path.
Keep scope narrow Virtualizing small fragments delivers strong protection with minimal performance overhead. Resist the temptation to protect more than necessary.
Manage your Certificate IV securely Treat the IV as a sensitive credential. Store it in a key management system and rotate it regularly as part of your build and deployment pipeline.
Plan for network availability Verify that target environments have reliable HTTPS access to the Skater Cloud Vault. Configure caching so that brief Vault outages don't disrupt the user experience.
Layer your defenses Code Virtualization is most effective when combined with symbol renaming, string encryption, anti-tamper measures, and standard control-flow obfuscation.
Test thoroughly Run tests for cold starts (first execution, requiring fragment download and decryption) and warm runs (using cached fragments). Also test behavior when the Vault is unreachable to confirm your fallback works as intended.
7. Performance and UX Considerations
Performance impact is generally minimal, since only small code fragments are virtualized. However, the first execution of a virtualized fragment may incur a brief delay for download and decryption. Subsequent calls should use the local cache, assuming caching is enabled.
Design your application so that virtualized code paths are not encountered during frequent user interactions. Reserve this protection for rare but sensitive operations.
8. Offline and Failure Modes
Opaquer provides two options for handling Vault unavailability:
- Encrypted local cache - cache decrypted fragments for a configurable period to reduce dependency on live Vault connectivity
- Graceful degradation - define a fallback response when the Vault is unreachable, such as blocking the protected feature, surfacing a user-facing message, or running a reduced-capability alternative
When implementing fallback behavior, ensure it does not expose or hint at protected logic. Log Vault availability issues to support diagnostics.
9. Troubleshooting
If protected code fails to execute or behaves unexpectedly, work through the following:
- Internet connectivity - confirm the runtime environment can reach the Skater Cloud Vault over HTTPS
- Certificate IV mismatch - verify the IV entered in the obfuscator matches the one associated with the uploaded fragments
- Missing dependency - confirm
Skater.Cloud.Vaultis referenced in the project and present at runtime - Execution frequency - ensure the protected method is not being called in a tight loop; high-frequency invocation may cause performance degradation
- Cache policy - check that the local cache hasn't expired or become invalid, which would force repeated downloads
- Vault status - verify that the Skater Cloud Vault service is available and that your account has the necessary permissions
- Loader logs - inspect runtime logs from the injected loader for authentication or decryption errors
10. Limitations
- Three-method cap - High-Intensity virtualization is limited to three methods per assembly
- Runtime internet requirement - protected assemblies require Vault connectivity, though local caching can offset brief outages
- Not a complete security solution - virtualization raises the cost of reverse engineering, but it does not replace secure server-side enforcement, sound application architecture, or proper key management
- Certificate lifecycle - Certificate IVs may be rotated frequently; account for IV management in your build and deployment workflow
11. Pre-Obfuscation Checklist
- [ ] Enterprise license is active
- [ ] No more than three methods are selected and marked
- [ ]
Skater.Cloud.Vaultis referenced via NuGet - [ ] Certificate IV has been retrieved from Keys Depot and entered in the Opaquer UI
- [ ] Target runtime environment has HTTPS access to the Vault, or a caching strategy is in place
- [ ] Fallback behavior, cache duration, and runtime logging are configured and tested
12. When to Use Code Virtualization
Code Virtualization is the right choice when you need to:
- Protect proprietary algorithms or business logic distributed inside a client binary
- Prevent easy reconstruction of license checks or cryptographic keys from a compiled executable
- Retain the ability to revoke, update, or replace protected logic remotely - without shipping a new binary
13. Recommended Scenarios
- Startup license validation - virtualize the critical check so attackers cannot trivially bypass activation
- Proprietary algorithm kernels - virtualize the decision logic or inner computation of a sensitive algorithm rather than the entire method
- Key derivation and secret handling - virtualize the fragments that manage cryptographic keys or sensitive data
14. Summary
High-Intensity Control Flow combined with Code Virtualization is a powerful, cloud-backed technique that removes critical logic from the shipped binary and executes it inside a protected VM at runtime. Use it selectively on no more than three methods, manage your Certificate IV carefully, plan for network reliability or caching, and layer it alongside other obfuscation techniques for the strongest overall protection.

Private Keys Depot
Rustemsoft presents a modern key management system that provides cloud data encryption approaches to secure your data keys.
What is Private Keys Depot?
Depot works by encrypting each key to help prevent unauthorized users from gaining access. Depot functions mostly as an active storage container for keys as well as an account management system for dealing with multiple privileged accounts across your company.
Skater Private Keys Depot protects cryptographic keys (that can be used as connection strings and passwords) in the cloud. When storing sensitive and business critical data, however, you must take steps to maximize the security of your Depots and the data stored in them.
We are going to provide an overview of security features and best practices for Private Keys Depot.
Private Keys Depot authentication option
When you create a Private Keys Depot within your Skater Depot license, it's automatically associated with the Registration ID of the license. All callers must register by using this Registration ID and authenticate to access the Keys Depot. Applications can access Private Keys and represents a service principal or managed identity. This identity is the most common scenario for applications that periodically need to access keys from the Keys Depot.
For this scenario to work, the Certificate IV (Initialization Vector) of the application must be specified in the access function signature and the Key Name must be specified as well.
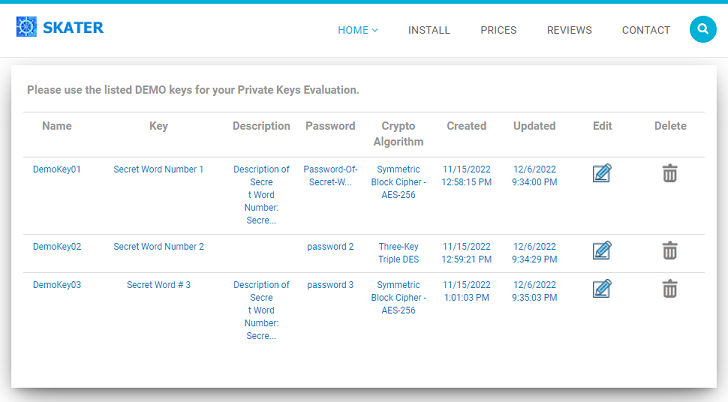
You have ASP.NET web application that uses a symmetric encryption algorithm. How would you store the secret key and IV? Storing as a hardcoded string value in the code seems like a bad idea. How about app settings? What is the best practice? How to achieve the best result?
The Skater Private Keys Depot is a key management system. This is a software system that stores .NET applications' encryption keys and performs cryptographic operations. The Skater Private Keys Depot as encryption key management software is used to handle the administration, distribution, and storage of encryption keys. The Skater Private Keys Depot ensures encryption keys, and therefore the encryption and decryption of their sensitive information, are only accessible for approved parties. .NET software developers use these solution to ensure access to highly sensitive .NET apps information remains secured.
KeysDepot Class
Definition
Namespace: Skater.Cloud.Vault
Assembly: Skater.Cloud.Vault.dll
KeysDepot class offers a convenient interface for making calls to the Private Keys Depot. KeysDepot class is a part of Skater.Cloud.Vault namespace. The API is .NET idiomatic Client library for Rustemsoft Cloud services.
|
C#
public class KeysDepot |
Let's suggest you have the following code that updating a SQL Server table records.
string sql_Query = "UPDATE MY_TABLE SET FLAG_FIELD = 1;";
string dBConnectionString = "Persist Security Info=False; User Id=UserName; Password=SecretPassword; Initial Catalog=MY_DATABASE; Data Source = ServerName;";
using (SqlConnection conn = new SqlConnection(dBConnectionString))
{
conn.Open();
using (SqlCommand cmd = new SqlCommand(sql_Query, conn))
{
cmd.ExecuteNonQuery();
}
}
The most vulnerable element, in terms of the possibility of a hacker attack, is of course the dBConnectionString connection string.
It contains secret data about connection to SQL Server. It must be cryptographically encoded and then securely hidden by storing to
a cloud server. By using Skater Private Keys Depot you can easily accomplish that.
Suppose you have certificate IV associated with your registered Depot account CERTIFICATE_IV. To get the Certificate IV (a cryptographic initialization vector) you need to access your
online Skater Private Keys Depot account and copy the IV. Also you have previously stored the key named CONNECTION_STRING_KEY in the Keys Depot.
You stored CONNECTION_STRING_KEY Key value as
"Persist Security Info=False; User Id=UserName; Password=SecretPassword; Initial Catalog=MY_DATABASE; Data Source = ServerName;"
So the above code that updating a SQL Server table can be modified as shown below:
Skater.Cloud.Vault.DepotKey depotKey = Skater.Cloud.Vault.KeysDepot.getKey("CERTIFICATE_IV", "CONNECTION_STRING_KEY");
if (depotKey != null)
{
string sql_Query = "UPDATE MY_TABLE SET FLAG_FIELD = 1;";
string dBConnectionString = depotKey.Key; // Connection String replaced with the depot's retrieved Key
using (SqlConnection conn = new SqlConnection(dBConnectionString))
{
conn.Open();
using (SqlCommand cmd = new SqlCommand(sql_Query, conn))
{
cmd.ExecuteNonQuery();
}
}
}
Method
Description
Returns Certificate data structure object
Returns IEnumerable<DepotKey>
Returns DepotKey data structure object
Returns string result information message
Returns string result information message
Returns string result information message
Returns string result information message
Property
Description
The names must be unique and do not start with a number.
"Symmetric Block Cipher - AES-256",
"Three-Key Triple DES", or
"Hash Functions - SHA-256"
Property
Description
Also there is IList<string> collection of cryptographic algorithm names in DepotKey class. The collection is useful to specify which one of 3 types algorithm you would like to utilize for your key cryptography.
Obfuscating XAML (BAML) in WPF Applications
Obfuscating XAML in WPF matters because BAML resources can be easily extracted and decompiled back into readable XAML, exposing your UI structure, bindings, and logic.
WPF Application Protection: Requirements & Restrictions
The Opaquer's WPF protection feature comes with a specific set of requirements that must be met before your application can be successfully protected.
Framework Requirement WPF protection is only supported for applications built on .NET 6 or later. Projects targeting older frameworks, including .NET Framework 4.x or any version prior to .NET 6, are not compatible with this feature and will not be processed.
Language Requirement Your WPF application must be written in C#. While the .NET ecosystem broadly supports multiple languages, WPF protection currently does not extend to VB.NET projects. Support for VB.NET is not available at this time, and attempting to protect a VB.NET-based WPF application will not produce the expected results.
Summary of Requirements
| Requirement | Supported | Not Supported | ||
|---|---|---|---|---|
| Framework | .NET 6, .NET 7, .NET 8+ | .NET Framework 4.x and below | ||
| Language | C# | VB.NET |
Please ensure your project meets both of these criteria before running the Obfuscator. If your application does not currently meet these requirements, consider migrating to a supported framework version or language to take advantage of WPF protection.
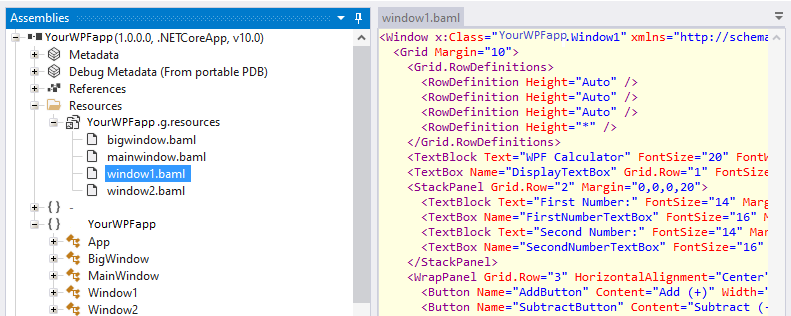
When a WPF application is built, its XAML files are compiled into BAML, a Binary Application Markup Language representation. BAML files are then embedded into the assembly’s resource container, typically:
- YourApplicationName.g.resources inside the final .exe or .dll.
At runtime, the .NET Framework loads these resources using Application.LoadComponent(), extracts the BAML, parses it, and constructs the corresponding WPF visual tree.
Why This Matters
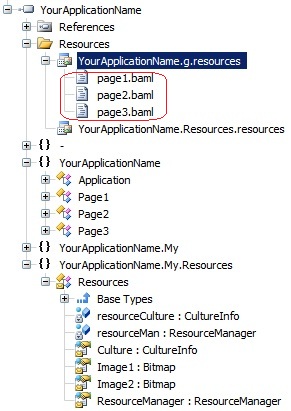
Every production WPF application relies heavily on resources, strings, images, persisted objects, and BAML. These resources are not executable code but are still essential parts of your UI and workflow.
Because BAML is simply a compiled form of XAML, specialized tools can read BAML and reconstruct the original XAML, revealing:
- UI layout
- Control names
- Bindings
- Styles and templates
- Navigation structure
This means anyone with a decompiler can inspect your UI, even if your C# code is obfuscated.
How Obfuscators Protect BAML
Opaquer .NET obfuscator includes features specifically for WPF:
- BAML rewriting (renaming identifiers inside BAML)
- Cross-assembly reference fixing
- Resource encryption or compression
- Metadata scrambling
Some tools historically struggled with WPF because BAML contains references to types, properties, and bindings that must stay consistent after renaming.
For example, Opaquer .NET Obfuscator includes dedicated BAML/XAML analyzers to rewrite these references safely.
Compare your assembly before and after WPF obfuscation
Suppose you have a WPF application called YourWPFapp that contains four WPF windows, as shown in the screenshot below. Using standard WPF inspection tools, anyone can click on any of these windows and easily browse the underlying XAML structure, including all controls, visual elements, bindings, resource references, and property values. This exposes important details about your application's internal design and implementation, making reverse engineering significantly easier. For commercial software, intellectual property protection and application hardening should be important considerations.
After applying Opaquer WPF Obfuscation feature, the situation changes completely. As shown in the second screenshot, the layout and structure of your WPF windows are no longer accessible through inspection tools. Attempts to browse the visual tree, controls, or XAML definitions result in exceptions such as:
"System.NotSupportedException: Specified method is not supported."
This occurs because all compiled XAML resources (BAML files) are encrypted and protected. As a result, attackers, competitors, or curious users cannot inspect the application's user interface structure, discover control hierarchies, analyze bindings, or extract implementation details from the WPF resources.
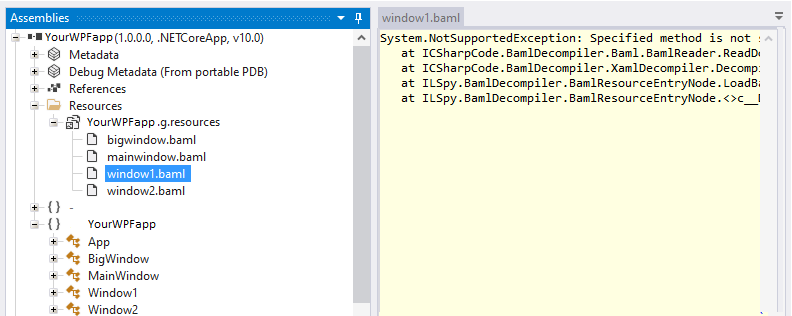
By encrypting and securing BAML resources, Opaquer .NET obfuscator helps protect your application's intellectual property, prevents unauthorized analysis of the UI architecture, and significantly increases the difficulty of reverse engineering WPF applications.
Why Obfuscate XAML/BAML?
Because BAML is not secure. Tools exist that load assemblies, extract BAML resources, and display the original XAML.
This exposes:
Proprietary UI/UX design
Custom control structures
Sensitive bindings or workflow logic
Internal naming conventions
For commercial software, this is a significant intellectual-property risk.
Summary
Obfuscating XAML in WPF is essential because:
- BAML is easily reversible, exposing your UI and logic.
- WPF relies heavily on embedded resources, making them a target for inspection.
- Attackers can reconstruct your XAML, even if your C# code is protected.
- Proper obfuscators rewrite BAML, preserving runtime behavior while hiding internal structure.
Assembly Settings Usage
The configuration settings you apply to a specific assembly can be saved and reused across sessions, streamlining your obfuscation workflow.
To save your current assembly settings, click the "Save Settings" menu item or press F4. This will open the save settings interface, allowing you to name and store the configuration for future use.
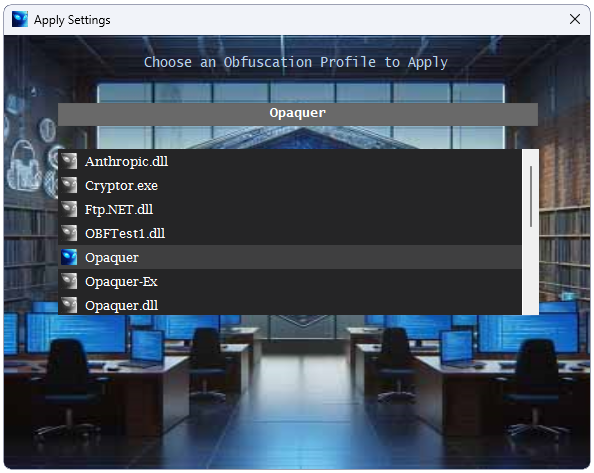
Once saved, you can later apply these pre-stored assembly settings by clicking the "Apply Settings" menu item or pressing F3. The saved configuration will then populate within the Opaquer interface.
Two Ways to Store Configuration in Opaquer
Opaquer offers two distinct methods for storing assembly configuration information:
-
Settings by name - As described above, you can store obfuscation settings under a custom name, making them easily retrievable via the F3 shortcut.
-
Project-level XML configuration - Obfuscation preferences can also be stored per project in a separate XML configuration file located within your .NET project folder. To apply these XML pre-stored settings in the Opaquer interface, use the Ctrl+F3 key combination ("Apply XML file Settings").
Benefits of the XML Configuration File
The XML settings file integrates seamlessly with your .NET project, offering several practical advantages:
- Easy backup - The file can be backed up like any other project asset.
- Version control friendly - It can be checked into your source code repository alongside the project.
- Team collaboration - Settings can be shared among multiple developers working on the same project.
- Portable - You can transfer the file to another development machine as part of the .NET project source code.
Command-Line Usage
In addition to the graphical interface, the stored settings can also be used for command-line obfuscation in batch MS-DOS mode. For more details, refer to the Opaquer console usage.
Integrating Opaquer into the Visual Studio Build Process
In a Visual Studio Deployment project, the PreBuildEvent runs after your assemblies are compiled but before the deployment/installation packages are created. This makes it the ideal stage to run Opaquer's command-line tool. Follow the steps below to set this up.
Setup Steps
-
Create obfuscation settings files for each assembly using the Opaquer GUI. For example, if your assemblies are named
MyFirstAssembly.exeandMyFirstAssembly.exe, save their settings files asMyFirstAssemblyandMyFirstAssemblyrespectively. -
Open your Deployment project in Visual Studio's Solution Explorer. If your solution contains multiple projects, select the one that builds first this way, dependent assemblies won't need to be obfuscated again separately.
-
Navigate to the Properties tab in the Deployment project. Note that this is accessed via the Properties tab in the panel, not by right-clicking and selecting Properties. This opens the Deployment Properties page.
-
Add the following commands to the PreBuildEvent field. Before doing so, test each command line outside of Visual Studio to confirm they work correctly.
    echo off
    echo Obfuscating MyFirstAssembly.exe
    "C:\Program Files\Rustemsoft LLC\Opaquer\Opaquer.exe" MyFirstAssembly
    echo Obfuscating MyFirstAssembly.exe
    "C:\Program Files\Rustemsoft LLC\Opaquer\Opaquer.exe" MyFirstAssembly
⚠️ Important: Avoid the Primary Output Build Error
A common and easy-to-miss issue can result in your deployed application not being obfuscated at all, even when the build appears to complete without errors. Here's what causes it and how to avoid it.
To reproduce the problem:
- Create a new web forms project in Visual Studio 2005 or later, then save and build it.
- Add a Setup project to the solution via File > Add > New Project > Other Project Types > Setup and Deployment.
-
Select the Setup Wizard template and complete the wizard as follows:
- Choose Create a setup for a Windows application.
- When asked which project output groups to include, check Primary Output from MyApp. This is the setting that causes the issue.
- Add any additional files as needed, then click Finish.
- Create your obfuscator settings file using the Opaquer GUI against the previously built assembly.
- Add the PreBuildEvent to the Setup project properties as described above.
- Build the Setup project. It will appear to succeed with no errors from Opaquer but this is misleading. Opaquer is processing the previously built assembly, not the one coming through the Primary Output pipeline.
- Run the generated
setup.exeor.msito deploy. What actually gets deployed is the Primary Output assembly the unobfuscated one. - Inspect the deployed assembly and you'll find that no obfuscation has been applied.
Integrating Opaquer .NET Obfuscation into Local Development and CI/CD Pipelines
Protecting your .NET application’s intellectual property is a critical part of any secure software delivery process. Even a simple .NET assembly can be decompiled into readable C# within seconds, making obfuscation a non-negotiable step before distribution. Opaquer .NET Obfuscator provides a robust command-line interface (CLI) that allows you to embed obfuscation directly into your build workflow, locally and in CI/CD, ensuring consistent, automated, and repeatable protection.
This guide walks through two essential integration layers:
- Local automation via Visual Studio post-build events
- Pipeline-level automation using Azure DevOps
The result is a seamless, end-to-end obfuscation strategy that protects every build intended for distribution.
1. Local Integration Using Visual Studio Post-Build Events
Integrating Opaquer into your local build process ensures that every compiled assembly is automatically obfuscated before it leaves your machine. This eliminates manual steps and guarantees consistent protection across developer environments.
Configuration Steps
-
Open Project Properties
In Visual Studio, right-click your project -> Properties. -
Navigate to Build Events
Select the Build Events tab. -
Add a Post-Build Command
In Post-build event command line, insert the Opaquer CLI command.
Before enabling Aggressive Control Flow Obfuscation, confirm that your project builds sequentially (details below).
Sample Post-Build Command
"C:\Program Files (x86)\RustemSoft\Opaquer\Opaquer.exe" ^
  -SOURCE="$(TargetPath)" ^
  -OUTPUT="$(TargetPath)" ^
  -KEY="$(ProjectDir)KeyFile.snk" ^
  -WRITELOG="$(TargetDir)Opaquer.log" ^
  -ALLPRIVATE ^
  -CONCEALSTRINGS ^
  -FLOW
Parameter Breakdown
| Parameter | Purpose |
|---|---|
-SOURCE="$(TargetPath)" |
Uses the freshly compiled assembly as input. |
-OUTPUT="$(TargetPath)" |
Overwrites the original assembly with the obfuscated version. |
-KEY="$(ProjectDir)KeyFile.snk" |
Re-signs the assembly using your strong-name key. |
-WRITELOG="$(TargetDir)Opaquer.log" |
Produces a log file for diagnostics. |
-ALLPRIVATE |
Obfuscates private members for deeper protection. |
-CONCEALSTRINGS |
Encrypts string literals. |
-FLOW |
Applies control-flow obfuscation. |
Critical Local Configuration: Disable Parallel Builds
Opaquer modifies assemblies immediately after compilation. If Visual Studio builds multiple projects in parallel, another project may attempt to load a DLL while Opaquer is still rewriting it, causing file-lock errors.
To avoid this:
Tools -> Options -> Projects and Solutions -> Build and Run -> Maximum number of parallel project builds -> set to 1.
This ensures deterministic, conflict-free obfuscation.
2. Integrating Opaquer into Azure DevOps CI/CD Pipelines
To guarantee that every distributed artifact is protected, obfuscation must also run inside your CI/CD pipeline. This ensures:
- No developer forgets to obfuscate
- Release builds are consistently protected
- Obfuscation becomes part of your security posture, not a manual step
Prerequisite
Opaquer must be installed on your self-hosted build agent.
Hosted Microsoft agents cannot be used because they do not allow installing custom software.
Pipeline Integration Strategy
- Build your project using MSBuild/VSBuild.
- Run Opaquer as a post-build step using a Command Line or PowerShell task.
- Publish artifacts, including the obfuscated assemblies and Opaquer log.
Sample Azure Pipelines YAML
- task: CmdLine@2
  displayName: 'Obfuscate MyLibrary.dll with Opaquer'
  inputs:
    script: |
      "C:\Program Files (x86)\RustemSoft\Opaquer\Opaquer.exe" ^
        -SOURCE="$(Build.SourcesDirectory)\MyProject\bin\Release\net6.0\MyLibrary.dll" ^
        -OUTPUT="$(Build.SourcesDirectory)\MyProject\bin\Release\net6.0\MyLibrary.dll" ^
        -KEY="$(Build.SourcesDirectory)\MyProject\KeyFile.snk" ^
        -WRITELOG="$(Build.ArtifactStagingDirectory)\Opaquer.log" ^
        -ALLPRIVATE ^
        -CONCEALSTRINGS ^
        -FLOW
  condition: and(succeeded(), eq(variables['BuildConfiguration'], 'Release'))
Key Pipeline Considerations
| Component | Explanation |
|---|---|
| Condition | Ensures obfuscation runs only on successful Release builds. |
| Path Variables | Use DevOps variables ($(Build.SourcesDirectory), $(Build.ArtifactStagingDirectory)) for stable paths. |
| Artifact Handling | The obfuscated DLL is automatically included in published artifacts. The log file can be published for review. |
3. Verification and Best Practices
Verification Checklist
- Inspect the output assembly using ILSpy or dotPeek to confirm obfuscation.
- Review Opaquer.log for warnings, errors, or skipped transformations.
- Run your test suite against the obfuscated build.
- Validate reflection-heavy components, as obfuscation may rename or restructure metadata.
Security Considerations
-
Protect your strong-name key
StoreKeyFile.snkin Azure DevOps Secure Files or a protected variable group. -
Secure your self-hosted agent
It contains source code, signing keys, and obfuscation tools. -
Limit access
Only trusted build administrators should have access to the machine.
Testing Recommendations
Obfuscation can occasionally alter runtime behavior, especially when:
- Reflection is used dynamically
- Types are loaded by name
- Plugins or MEF components rely on metadata
- Serialization frameworks expect stable identifiers
To mitigate risk:
- Run unit tests against obfuscated assemblies
- Run integration tests for reflection-dependent components
- Perform performance benchmarks on critical paths
- Validate startup time, as heavy obfuscation can add overhead
Summary
By integrating Opaquer .NET Obfuscator into both your local development workflow and your CI/CD pipeline, you create a secure, automated, and repeatable protection strategy. Every build, whether compiled on a developer machine or produced by Azure DevOps, emerges fully obfuscated, re-signed, and ready for distribution.
This approach:
- Eliminates manual steps
- Ensures consistent protection
- Reduces human error
- Embeds security directly into your development lifecycle
Using Custom Attributes from the System.Reflection Namespace
The .NET Framework includes the System.Reflection.ObfuscateAssemblyAttribute attribute, originally introduced to help developers guide obfuscation tools without relying on external configuration files. While this attribute remains part of the .NET platform, Opaquer .NET Obfuscator provides a far more powerful and flexible configuration model through its GUI-based, pre-stored settings. For this reason, we recommend using Opaquer’s built-in configuration system as your primary method of controlling obfuscation behavior.
However, if you prefer to embed obfuscation hints directly into your assembly, Opaquer does support the ObfuscateAssemblyAttribute with some important limitations and usage rules described below.
How Opaquer Uses ObfuscateAssemblyAttribute
Opaquer recognizes and processes the System.Reflection.ObfuscateAssemblyAttribute only when it appears at the assembly level. The attribute acts as a high-level instruction that tells Opaquer whether the assembly should be treated as a private assembly or a library assembly during the obfuscation process.
Assembly Mode Behavior
The attribute exposes two key properties:
-
AssemblyIsPrivate
Determines whether Opaquer should treat the assembly as private or as a shared library. -
StripAfterObfuscation
Controls whether Opaquer removes the attribute from the final obfuscated output.
How Opaquer Interprets AssemblyIsPrivate
AssemblyIsPrivate Value |
Opaquer Behavior |
|---|---|
true |
Opaquer treats the assembly as private. Public types and members will be renamed, following your pre-stored obfuscation settings. |
false |
Opaquer treats the assembly as a library. Public types and members will not be renamed, even if your obfuscation settings normally allow renaming. |
This mechanism allows you to embed a simple, assembly-wide rule directly in your code, although it cannot replace the fine-grained control available through Opaquer’s GUI configuration.
Stripping Declarative Obfuscation Attributes
When Opaquer processes an assembly containing ObfuscateAssemblyAttribute, it can optionally remove the attribute from the final output. This prevents the obfuscated assembly from revealing metadata about how it was processed.
The attribute’s StripAfterObfuscation property controls this behavior:
- Default value:
false - When set to
true: Opaquer removes the attribute after obfuscation - When set to
false: Opaquer leaves the attribute intact
This gives you control over whether the obfuscation hints remain visible in the final binary.
Example Usage
The following example marks an assembly as private and instructs Opaquer not to strip the attribute after obfuscation:
using System;
using System.Reflection;

[assembly: ObfuscateAssemblyAttribute(true, StripAfterObfuscation = false)]
In this configuration:
-
AssemblyIsPrivate = true
→ Opaquer renames public types and members according to your stored obfuscation settings. -
StripAfterObfuscation = false
→ The attribute remains in the output assembly.
Important Notes and Recommendations
-
Opaquer does not support
ObfuscateAssemblyAttributeby default.
The attribute is recognized only when explicitly present in your assembly code. -
Opaquer’s GUI configuration provides far more granular control.
You can define detailed rules for individual namespaces, classes, methods, properties, and fields something the attribute cannot express. -
Pre-stored settings override attribute limitations.
The attribute can influence high-level behavior, but Opaquer’s configuration files remain the authoritative source for detailed obfuscation rules. -
Use the attribute only when you need assembly-level hints embedded in code.
For most scenarios, especially CI/CD workflows, command-line parameters and GUI-generated settings are the recommended approach.
Summary
System.Reflection.ObfuscateAssemblyAttribute provides a simple, assembly-level mechanism for influencing how Opaquer processes your code. While Opaquer supports this attribute, its capabilities are limited compared to the comprehensive configuration options available through the Opaquer GUI. For best results, treat the attribute as an optional hinting tool rather than a primary configuration mechanism.
Opaquer Watermark
What is Opaquer Watermark?
Opaquer .NET Obfuscator extends the watermarking concept to compiled .NET assemblies (DLLs and EXEs). It allows you to embed a unique, persistent identifier directly into your protected assembly.
This watermark acts as a hidden signature one that travels with your software wherever it goes.
Once applied, the watermark can be inspected at any time using the Opaquer interface. If you encounter a suspicious third-party assembly, simply load it into Opaquer and check the “Opaquer Watermark” property to verify its origin.
Why Watermark Your Assembly?
Obfuscation protects your code from reverse engineering but it doesn’t fully prevent misuse of your compiled binaries. For example:
- Someone might redistribute your software under a different name
- Your DLL could be embedded into another commercial product without permission
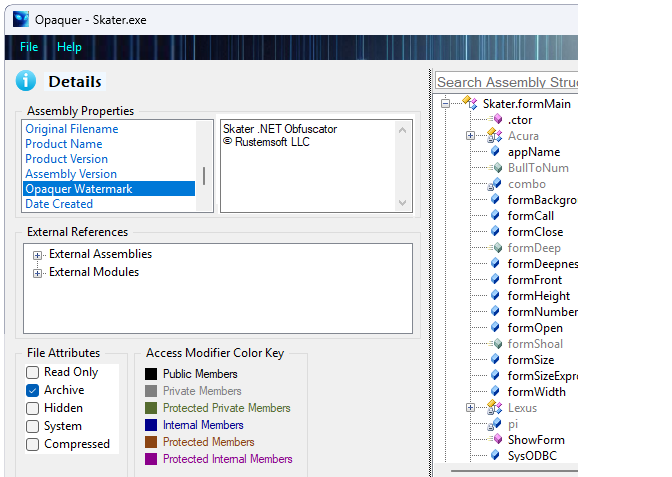
A watermark addresses this gap by providing traceability.
Even if your assembly is copied or repackaged, the watermark remains embedded and detectable.
How It Works
When you protect your application with Opaquer:
- Your assembly is obfuscated into a form that is extremely difficult to decompile or recompile
- The watermark is injected into the assembly metadata in a way that cannot be removed without breaking the binary
- Any attempt to modify or strip the watermark would invalidate the assembly
This makes the watermark effectively tamper-resistant.
Setting Your Watermark
To create and apply your personalized watermark:
- Open Account Settings in the Opaquer interface
- Click “Log In Online”
- Access your Opaquer account dashboard
- Locate the Watermark Generation section
- Define your unique watermark value
Once configured, this watermark will be embedded automatically during the obfuscation process.
Key Benefits
1. Ownership Verification Quickly confirm whether a DLL or EXE originated from your build pipeline.
2. Protection Against Unauthorized Redistribution Even if your software is copied or rebranded, the embedded watermark exposes its origin.
3. Deterrence The presence of a persistent, non-removable identifier discourages misuse and unauthorized reuse.
4. Brand Recognition Your assemblies carry a consistent signature, helping partners and customers identify your software components.
5. Evidence in Disputes Watermarks can serve as technical proof in licensing or intellectual property conflicts.
Important Notes
- Watermarking is not a replacement for licensing or legal protection it complements them
- It works best when combined with obfuscation, licensing, and distribution controls
- While invisible to end users, the watermark is reliably detectable through Opaquer tools
Summary
Opaquer Watermark adds an additional layer of protection beyond traditional obfuscation. It doesn’t just hide your code it helps you track it, prove ownership, and defend it.
FAQ
What does the Opaquer documentation explain?
The Opaquer documentation explains how to protect .NET applications using advanced obfuscation techniques including identifier renaming, control-flow obfuscation, string encryption, resource protection, metadata transformation, code virtualization, and anti-decompiler technologies. It also describes configuration options, project setup, and command-line automation
Which versions of .NET does Opaquer support?
Opaquer supports classic .NET Framework as well as modern .NET releases including .NET Core and .NET 5 through .NET 10, allowing developers to protect both legacy and current applications
Can I automate Opaquer during my build process?
Yes. Opaquer includes command-line automation that integrates easily into CI/CD pipelines, MSBuild, Azure DevOps, GitHub Actions, TeamCity, Jenkins, and other automated build systems
What protection techniques are available in Opaquer?
Opaquer provides multiple protection layers including identifier renaming, control-flow obfuscation, string encryption, resource encryption, metadata protection, code virtualization, anti-tamper technologies, and anti-decompiler protection. These techniques can be combined to significantly increase the cost of reverse engineering
Can I choose which parts of my application to protect?
Yes. Opaquer allows fine-grained configuration so developers can apply different protection levels to specific assemblies, namespaces, classes, or methods while excluding components that require reflection, serialization, or third-party compatibility
Will obfuscation affect application functionality?
Opaquer is designed to preserve application behavior while transforming compiled assemblies. The documentation includes configuration recommendations for applications that use reflection, WPF, serialization, dependency injection, or dynamically loaded assemblies
Does Opaquer protect applications from decompilers like ILSpy and dnSpy?
Yes. Opaquer applies multiple layers of protection that significantly reduce the readability of decompiled code by transforming control flow, encrypting sensitive data, hiding metadata, virtualizing selected methods, and producing output that is much harder to analyze
Can Opaquer protect only performance-critical code selectively?
Yes. Performance-intensive protection methods such as code virtualization can be applied only to security-critical methods while the remainder of the application uses lighter-weight obfuscation techniques for maximum performance
Does Opaquer generate mapping files for debugging?
Yes. Opaquer can generate mapping information that helps developers interpret obfuscated stack traces and diagnose production issues without exposing the original source code
Is Opaquer suitable for commercial and enterprise software?
Yes. Opaquer is designed for independent developers, software vendors, and enterprise organizations that need strong protection for intellectual property, licensing systems, proprietary algorithms, and commercial .NET applications
------------------------------------------------------------------------------------------------